Comprehensive Guide to Crossgun Kai
This guide is written to players of any skill level and details information on Crossgun.
It is separated into three parts: beginner, intermediate and expert. Each part builds on each other, however if you have already played kai and know what you are doing, you can just skip to your level. The aim is to gather all the relevant information regarding crossgun gameplay and to educate players, no matter their current level.
I personally have played crossgun for years, yet I still find new tricks to use even to this day. I will keep this guide up to date as a new utility patch is right around the corner.
Special thanks to Receiver for helping with the structure, to Florrick for inspiration, to Talys for being my mentor and Ido, y0ng$ack, Karpfen and LoclacPanda for their help with proofreading and corrections.
Table of Contents:
- Stage 1: Beginner
- 1.1: Skills
- Left click attacks
- Revolver mechanics
- Buffs
- Tier 1 Revolver Skills
- Tier 2 Revolver Skills
- Other Skills
- 1.2: Artifact
- 1.3: Awakenings
- 1.4: Fervor/Impact (Transformation Skill Choice)
- 1.5: Key Layout
- 1.6: Leveling
- 1.1: Skills
- Stage 2: Intermediate
- 2.1: Damage Rotation
- 2.2 Aiming
- 2.3: Stats
- 2.4: Movement
- 2.5: Situational skill rotation, opener
- 2.6: Cutscenes
- 2.7: Animation Cancelling
- 2.8: Facetanking
- 2.9: Bugs
- Stage 3: Expert
- 3.1: Party play and aggro management
- 3.2: Niche tricks
- Quick Break-Off
- Preparing Skills
- Ranging during One-hit-knockouts (ohkos)
- SP generation on dead mobs
- Reload levels
- Range of abilities
- Paladin vs. Dark Knight
- Buffs refreshing
- 3.3: Boss Specific Tips
- Royals
- Raids
- Redeemers
- Space Time Distortion
Stage 1: Beginner
So you decided to pick up crossgun and are looking for some information on getting started.
The gameplay of this ranged weapon follows a set rotation and is focused on resource management. This means that since you are playing around the cooldowns of your skills, you have to make sure you build enough SP so as to not disrupt the rotation.
1.1: Skills
Kai on both weapons has a common skill other characters do not, which is extra damage when hitting a boss’ weak-point:
 Headshot: +25.5% extra damage if you hit the boss on the weak part or the head. Pretty straightforward, the skills which are affected by it are:
- Normal attacks (and the effects which boost it, such as Insight and A&D)
- Perforate
- Six shooter
- Boltstorm
- Left click attacks

Reload: This is your magazine size. 68 bolts at rank6, however leaving it at rank 9 or C also has its benefits later on. You use your normal shots mostly as filler and to gather SP for your actual skills.
 Insight: Passive skill. Makes every 7th shot deal extra damage.
Armed & Dangerous (A&D): If you reload when you have less than 15% of your bolts remaining (last 10 if reload is rank6), then you get 70 stamina back and your next 25% (17 at rank6) bolts will deal increased damage (3.3x). Always do this. Missing out on one reload is painful but not horrible, missing out on two or more can deplete your stamina very quickly and you will be missing out on a lot of damage. If you can, try to empty these 17 shots into a weak-point (Headshot). 
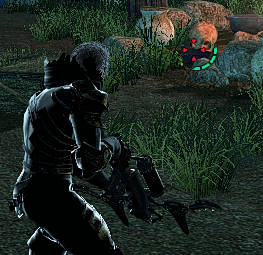
An easy way to keep track of when you have only 10 bolts left, is to look at your crosshair. The little green bars show your remaining bolts with one bar at each 25% of magazine. At 68 bolts you have 17 bolts per quarter, so an easy way to always reload is after you have shot a few shots on your last bar.

- Revolver mechanics

Bolt-revolver: if you hold down right click, a menu will come up. There are two tiers: Tier 1 enables you to use Hollow Shot, Perforate or Six Shooter, while Tier 2 lets you load up Boltstorm or Massive Impact.

Quick Draw: It allows you to skip charging up one tier instantly every 6 seconds. You can best use it to skip the loading from tier 1 to tier 2 and use tier 2 skills instantly. However you should try to use it as often as possible on tier 1 skills as well. Video on using Quick Draw: Revolver tier skip
- Buffs

Active: Enhanced Bolt. No SP cost. Increases explosive damage and modifies some skills. The damage increase is around 15-20%, but it depends on the skill used.
The way it modifies skills:
- Hollow shot gets a second attack. Instead of one explosion, you can now cast the first one with +33% damage increase and the second with -16.7%. This way you more than double your damage on your hollows.
- Perforate loses its ability to headshot, however it gets an increased 15-20% damage no matter where you hit your target. It increases the SP gained from the skill as well. While it will do less damage than headshot, you probably get more overall dps out of it.
Active: Hunting Party. 250 SP cost. Gives you +30% SP generation and +40% movement speed during walking and running. Gives your party +8% SP generation. You need to manage SP, well here is a tool that helps you do that. 
- Tier 1 Revolver Skills

Active: Hollow shot. Your bread and butter skill. It has a 6 seconds cooldown, try to use it whenever possible. Press left click again during Enhanced Bolt for the additional attack.

Active: Perforate. 250 SP cost. Fire 5 penetrating projectiles that damage small bosses 3x, large bosses 5x. 2nd and 5th hits only deal half the damage of the first tick. This is your main SP generation tool. It also kills any normal monsters with 100% of their HP +1 damage. Also penetrates, so try to line up your shots.

Active: Six Shooter. 500 SP cost. Fire 6 bolts in a shotgun pattern which stick to the boss. Second click releases the detonator round. I recommend using this only while you have Enhanced Bolt activated.
- Tier 2 Revolver Skills

Active: Bolstorm. 750 SP cost. Your highest damage output skill. Once you load it up you are immobile for 6 seconds while shooting 45 high damage bolts like a machine gun. You can cancel the skill any time by dodging or pressing right click (never right click during it, that only happens by mistake).

Active: Massive Impact. 750 SP cost. A nuke. A literal nuke. Very high instant damage, large Area of Effect (AoE), flinches the boss. Also a coin flip. If you crit, we are happy, if you don’t, we are lamenting the SP cost. Mostly used as a way to interrupt the boss or instead of Six Shooter when Enhanced Bolt is on cooldown.
Although the AoE is large and the shot has an incredible range, try to aim for the boss’ feet. Missing a shot like this because the boss moves to the side just hurts.
- Other Skills
Spin Smash. Right Click after your dodgeroll to deal little damage. I honestly do not know why this skill is still in the game. I heard someone say it is only used as a mistake and I tend to agree. There are some very niche uses for it, but later on that.

Active: Hand Bomb. This is your break-off tool. Either activate from the skill bar or press E during dodge. Once you chuck enough of this bad boy at the enemy, they will flinch a few times. Depending on the boss, after the second or third flinch they generally give up their break-off loot for your party. You can generally ignore this skill after the break off happens. It is also useful for breaking trash mobs out of their guarded stance: video on Dealing with melee knights.
Active: Bunker Buster. 750 SP. This is your stun. However since you are strapped for SP most of the time, let others stun for you. While the boss is stunned it is also a prime opportunity for you to Boltstorm the boss’ head. 
1.2: Artifact

Greater Mysterious Cat Statue. Gives you 250 SP every 70 seconds. Helps with your opener and SP generation in general.

Greater Succubus Fang. Lifesteal once activated, only use it for practising difficult fights you are still learning. Not extremely useful outside of starting out on late game content.
1.3: Awakenings

Active: Enhanced Bolt. Major Cooldown.

Active: Hunting Party. Efficient SP.

Active: Hollow shot. Damage Boost.

Active: Perforate. Efficient SP. / Damage Boost. (depends if you have good SP management or not. I recommend starting with SP reduction until you are comfortable.)

Active: Six Shooter. Damage Boost.

Active: Bolstorm. Efficient SP. (the days of spamming boltstorm are long gone thanks to the recent patches, however if you do want to play around this skill instead of Enhanced Bolt, put Cooldown reduction on this and Efficient SP on Perforate.)

Active: Massive Impact. Major Cooldown.

Spin Smash. Damage Boost.

Active: Hand Bomb. Efficient SP.

Active: Bunker Buster. Damage Boost.
1.4: Fervor/Impact (Transformation Skill Choice)
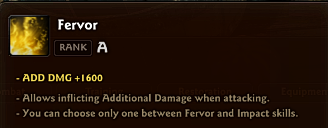
Fervor. Adds more damage during your transformation. There is no point taking Impact as kai has no use for hit drag reduction.
1.5: Key Layout
It is best that you personalise your UI to fit your playstyle. Put your active skills on your skill bar - not to activate them from it, but to see the cooldowns. That way you can easily see what is coming off cooldown when. Here is my screen as an example:
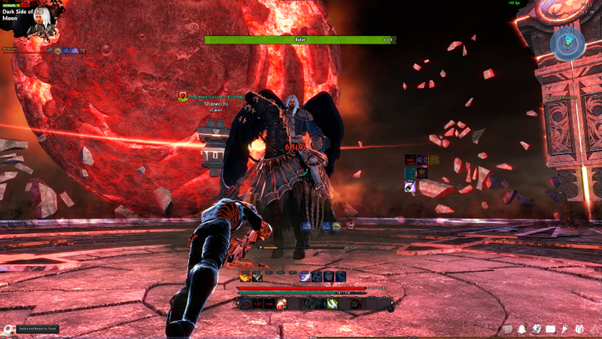
I have my skills on the right side to see the cooldown, the boss Hp above the screen, the Sp bar and active buffs right below the crosshair. This works for me but it might not work for you, so see what feels comfortable.
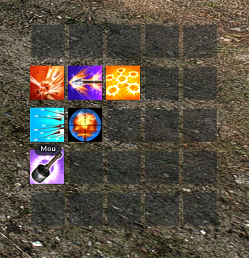

I activated the third bar in Ui settings to make myself a little display to the right of my crosshair.
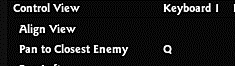
Another must have: bind a button to Span to Closest Enemy and tick the camera settings to lock vertical motion. I bound this to Q for ease of use. If you press this button, the game will autoaim you towards the boss, helping you track them during Boltstorm, lining up Perforate or simply turning towards them when they suddenly disappear and reappear. However keep in mind that the camera is shifted a bit, so you might have to slightly pull the mouse to the left while you keep spamming the Span button.

1.6: Leveling
There are not many tips I can give you during leveling. Everything dies very easily and you can destroy most mobs with normal shots and hollow shots. For heavy enemies simply one-shot them with Perforate.
As for upgrading skills past the play guide recommendations, try to level up Insight and Armed & Dangerous first along with Hollow shot.
Stage 2: Intermediate
So you know the basics of crossgun. Now let’s see if you know of the following as well.
2.1: Damage Rotation
I keep mentioning SP management, but it is all for a purpose. You have many skills, all with different cooldowns. To chain these skills well enough that you are only bottlenecked by your cooldowns, you need to put them in the right order, otherwise you run out of SP and your skills will just go unused.
Here is a good all-rounder that you can always do and is the correct answer to most situations. The first part of it is used while Enhanced Bolt is active, the second part is your “off-rotation”, while you wait for the buff to come back online (video: Normal rotation):
Start by activating Enhanced Bolt and Hunting Party.

 Hollow Shot (2x)
 Perforate
 Hollow Shot (2x)
 Six Shooter
Rinse and Repeat until Enhanced Bolt goes on cooldown. If you see the buff is about to expire, hold off on the last Six Shooter and save up your SP.
 Hollow Shot (1x)
 Boltstorm
  Hollow Shot (1x)
 Perforate
 Hollow Shot (1x)
 Massive Impact
After this your Enhanced Bolt should be available again and you may go back to the first rotation. The idea is to keep alternating Perforate and Six Shooter while you use Hollow Shot to fill up the time. While you have those skills on cooldown, you can gather SP via normal shots, reload, shoot the A&D bolts.
In your off rotation however we use the Boltstorm and instead of an unenhanced Six Shooter we risk the coinflip on the nuke. If you still want to play long range and have no Massive Impact available, you can use the trans spear as a filler instead for 250 SP.
Sidenote: if you activate both your buffs early on, you might have to wait with the first perforate until you gather enough sp. You will probably have to do hollows, normals, hollows before you can start up your rotation. Alternatively you can activate your Hunting Party after the first Perforate.
2.2: Aiming
Due to the nature of crossgun, the camera is misaligned to the right. This places your crosshair in the middle, but your character to the left. In close combat, your shots will not go to where your crosshair is, but in a straight line from your character on the left side. When shooting Perforate, Boltstorm or Normal shots in close range, I suggest spamming Span to Closest Enemy to make sure your shots land.
For far away targets, you have to adjust your aim by putting the crosshair a bit down and to the left. Also keep in mind, your bolts have projectile travel time. If the boss is moving, you have to guess how much further you need to aim.
Video on perforate travel time: Perforate aiming on dynamic bosses
2.3: Stats
SP management is very important for Kai. Thankfully there are scrolls available that help you do just that. You should put Calm or Quiet on the Prefix slot for Rhod Compass due to the high rate of fire on your attacks.
Keep in mind you have 3 chances every day to pick up the Fortune Cookie scroll. First in the guild house, second for 1 Honor Medal, third for 2 Festival Trophies. They have a chance to provide you with +10% or +30% SP generation for 24 hours, which is incredibly useful.
Kai has a quirk when it comes to his stats. His speed is locked behind speed-tiers. Due to how the animation on normal shots work, no matter how much speed you have between them, it will not change your actual shooting speed. The speed tiers for crossgun are the following: 0/13/38/71/125.
As 125 is hardly reachable as of yet, try to aim for exactly 71. A bit more is not a problem, however do not go below this number. This is lucky in a way that when you gear, you can probably pass on those Fast scrolls. This also means you have very little use for scrolls like Dash and Outburst, so only get them if you have spare gold and enchant rune.
Also keep in mind that Boltstorm will always crit on every shot. If you lack the stats (boss’ critical resistance + 50, then it might be better for you to build your rotation around using as many Boltstorms as you can.
2.4: Movement
There are three ways to dodge on kai and also you can mix them to fit the situation.
You can either:
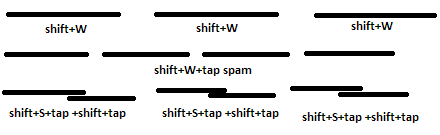
- Press the dodge button with a directional input (eg. wasd+shift/space) or press it by itself and it is an automatic backwards dodge.
- Press the dodge button with a directional input but tap left click once towards the end of the dodge. This will then shorten your iframes but allow you to quickly do another dodge. Use this when you want to move in a direction quickly instead of just sprinting.
- Press the dodge button with a directional input, tap left click once. Now quickly press the dodge button again by itself and tap left click once. This will allow you to very quickly chain two dodges after one another. There is only one frame of vulnerability between the two. If your directional input is S however, you can move incredibly fast backwards (or forwards if you turn the camera opposite of where you want to go). Videos: Normal dodge with L tap / Fast dodge
Alternatively if purely for sprinting, after activating Hunting Party you get a +40% movement speed. This is as fast as the 2nd method described above.
2.5: Situational skill rotation, opener
Some bosses will have opportunities for you to Boltstorm their weak spot for at least 6 seconds. In these cases it is better to disrupt your Enhanced Bolt based rotation in favour of gathering enough SP and unleashing Boltstorm at the opportune moment. Video on saving boltstorm for when you get the most out of it: Balor horse headshots and Balor ohko end Boltstorm
Alternatively you can ignore the duration on Enhanced Bolt and put the reduced cooldown waking stone on Boltstorm, forcing you to use it immediately once it is off cooldown. Based on my experience with current late game content, I do not think this build is very viable anymore, however it is somewhat up to personal preference.
As for the opener I decide based on the distance to the boss when entering the final room.
If the boss is far away, instead of activating both your buffs and starting with Hollow shot, you can start with:
- Enhanced Bolt
- Perforate (only first 2-3 shots)
- Hunting Party
- Last 2-3 shots of perforate
Then you close the distance with the speed buff from Hunting Party and go into normal rotation. This method lets you get the +30% increased SP generation on the second half of your Perforate. How this looks like in practice: Perforate opener.
Your best opener most of the time however is unloading a Boltstorm because you gathered enough SP from the mobs while getting to the boss room. Afterwards you can go into either the Perforate starter or the Hollow Shot starter.
Although not recommended, if you plan on saving up health potions but have enough Goddess Graces, you can die “intentionally” once per raid for an extra +500 SP and a quite hefty invulnerability period. Keep in mind however that your buffs will be gone and still on cooldown if you used them before.
2.6: Cutscenes
Do not just stand idle during cutscenes, if you know it is coming, try to unload your A&D into the boss. You can then empty your magazine again during the cutscene and have it up by the time the boss is ready for the next phase.
This point also links back to the opener. If your party allows enough time for it, empty your magazine and prepare A&D before entering the bossroom.
If you have Perforate loaded and already some bolts shot, it might be worth emptying the rest of the magazine so the cooldown starts and you can begin with Hollow Shots.
Also some cutscenes lock you from taking any action, in these cases you might be able to still activate buffs, healing items and repair kits by manually clicking on the skill bar with your mouse.
Another thing to keep in mind, if you release your Six Shooter and a cutscene happens, all your damage is wasted that you paid 500 SP for. Learn at what HP bars the bosses go into their next phase transition and do not waste your skills when they go invulnerable. Lastly, just remember, missing shots is not the end of the world no matter how annoying it can be. Just focus on recovering and start building your SP back up. Everyone makes mistakes.
2.7: Animation Cancelling
With crossgun damage being highly hard-capped by skill cooldowns, the ability to cancel animations is extremely useful and in the end necessary to deal comparable damage to other high end players.
You can dodge after the following skills to shorten their animation:
- Reload (If dodged after reload, the effect will still happen but you are free to do other things)
- Hollow Shot
- Six Shooter first shot (do a backwards dodge right after the first shot for tightening the spread.
- Boltstorm (While I recommend letting the skill run its course for the full 45 bolts, sometimes you get stuck in animation at the end. Dodging out at the end should become second nature to you to prevent this.)
- Hand bomb (After using it from the skill bar, you can then press E during the dodge for a second grenade) video: Double Hand Bomb
As mentioned in the movement section, Normal shot at the end of the dodge will speed up the animation and reduce the time until you can attack again, however it also cancels invulnerability frames - it’s not always the best to cancel dodges, but that depends on your situation.
You can also use Hunting Party and Enhanced Bolt during any shot of Perforate or Six Shooter. This is especially useful to activate the Enhanced effect on Six Shooter after releasing the detonator but right before the explosions happen.
Lastly you can also cancel Paladin/Dark Knight transformation by pressing Reload then quickly using trans. When reload ends, you will be immediately transformed. This is also possible on trans2 but much harder to time it well.
2.8: Facetanking
Kai has hyper/super armour (not having animations cancelled while casting). Use this if you have relatively high defence (since pots will become expensive otherwise if you do this on purpose).
For example if the boss is about to hit you, you can at the same time shoot a Perforate, take the damage but keep up the constant damage. Or instead of cancelling Boltstorm early because the boss targets you, you can just sit tight and endure the onslaught for the full 45 bolts. More defence = More damage output.
2.9: Bugs
It may happen quite often that after loading up Perforate, Six Shooter or at the end of Boltstorm your character is stuck until you move with wasd or dodge. I make it a habit to hold down a movement key during these actions or dodge out after Boltstorm.
Sometimes it may happen that your character is “sliding”. If this happens try dodging and pressing right click for Spin Smash, it should reset your animation
Stage 3 : Expert
Now you know almost everything there is to know about crossgun kai. What else could even surprise you at this point?
3.1: Party play and aggro management
Since you are playing a ranged class, people will hate you. The reason is that since you have range, you can get by with shooting from afar. Will your dps suffer for not going close for Hollow Shots and Six Shooter? Yes. Will you be safe? Mostly.
But once you get aggro, the boss will chase you and your party will chase the boss chasing you. To prevent everyone having a bad time, you have to unfortunately learn to play close. This also means if the boss aggros you, you dodge towards a wall or into the boss to keep him in place, while sacrificing your own damage. Although you might think this unfair, the more you accommodate your team, the faster you will clear the content. In turn you can also ask them to tank the boss at the edge of the arena where applicable, so you can easily guess where to aim. Video on keeping the boss steady: Dodging into the wall instead of running away
3.2: Niche tricks
- Quick Break-Off:
I mentioned this before, but you can prepare two hand bombs at the same time. After using it from the skill bar, quickly dodge forward and press E to release a second one. Spam this while you are fishing for Break-Off, then you can just stick to dodge+Es for a little extra damage, should you still have excess SP. Video: Double Hand Bomb
- Preparing Skills:
If you see a boss is about to land, for example Balor or Bres, you can already pre-fire a Perforate. By the time the boss actually lands, the projectile will have reached them.
You can also shoot the first shot of Six Shooter into the ground, as the initial damage is negligible. Release the detonator right before the boss lands and you are free to already Hollow Shot while the explosion happens.
You can also load up skills such as Six Shooter or Boltstorm during a cutscene most of the time.
- Ranging during One-hit-knockouts (ohkos):
If you are afraid of getting hit by the swings of a boss in duo or 8-men and your perforate is on cooldown but hollow range is too dangerous, feel free to toss a hand bomb towards the boss.
- SP generation on dead mobs:
While you are waiting for your party to go from the mini boss to the boss’ room, keep shooting the dead mobs with normal shots. The game registers the hits and gives you a chance for your Calm or Quiet scrolls to generate SP. Sometimes it can tick even 3x, easily getting your enough SP to start with a Boltstorm.
- Reload levels:
While rank6 at 68 bolts in the magazine gives you 17 bolts with A&D, rank9 at 56 bolts gives 14 (already two ticks of Insight), making the rank 9 better average damage per full magazine. However, taking into account that you benefit the most from more A&D shots and you can prepare them before the fight and during cutscenes, I generally recommend upgrading all the way to rank6.
There is another viable build at rank C though. With only 44 bolts in the magazine, you have to reload just under 6 bolts, getting 11 A&D shots, but you have to empty 20 less bolts per magazine, making this an excellent way of increasing your stamina regeneration massively. For endgame content such as Space Time Distortion battles, where your stamina management is much more important with the chained quick dodges, this might be the best option.
At the end of the day, this choice comes down to personal preference, playstyle and content that is being run.
- Range of abilities:
While you might think Massive Impact has infinite range, that is not the case. It falls off on extremely long shots, especially those outside the map. Six shooter however actually sticks to the skybox and you can even damage Royal Elchulus when he flies onto his rock island or Shakarr during The Final Fortress from the catapults area. You will only reach the boss with 1 or 2 explosions however due to the spread of the skill.
- Paladin vs Dark Knight:
Although Dark Knight offers more visibility during boltstorm (less annoying orbs, instant effect), I prefer Paladin purely because Sacred Sword has a long reach which fits the ranged playstyle better. It is perfect to use after Boltstorm.
Conviction can block ohkos, however when you get hit, you sometimes get bugged and have to do a spin smash to get out of it. In the current raids the ohkos break through your shield first so I recommend not relying on it.
- Buff refreshing:
Your Hunting Party and Enhanced Bolt buffs refresh automatically when you enter a new room in red moon’s energy battles and the guild dungeon. So feel free to at least actively use Enhanced Bolt in every room.
Activating the Friendship Stun also switches your weapon to Bow for a period of time, when the skill ends and your crossgun returns, so will your buffs be off their cooldown.
3.3: Boss Specific Tips
- Royals:
- Siglint - When he reaches his last 5 health bars, he will go into a petrifying phase for quite some time then heal back up. To prevent this, save up your Massive Impact and flinch the boss when he lowers his head. Another tip is to save up Boltstorm in case someone crashlands him, then unload Boltstorm on its tail. Videos on why we save Boltstorm and Massive Impact for the opportune moment: Siglint crash weakspot and petrify flinch
- Beokros - Not much to say, try to dodge the freezing projectiles. You have a cheap and rapid fire ranged ability, so keep an eye out for teammates and break them out of ice.
- Elchulus - Once you have built the barricade and received the buff, your SP generation increases tremendously. The barricades can be set up even before the fight, but people will probably just start it before you can finish playing Bob the Builder.
- Raids:
Remember when I mentioned that Perforate one-shots normal mobs? Since the Divine Armor Knights have roughly 1-2 million HP, it is a quick way to advance to the boss room (video: Clearing up to Milo solo). However it is good etiquette to always ask your party whether they prefer to use them as punching bags for the extra SP or they prefer to just get the raids over with as fast as possible. With that out of the way, here are some useful tips when facing the raid bosses:
- Romel - Double Hand Bomb setup (video: Romel Setup). If you let others reach the boss room first, you can then run to the middle during the initial cutscene and set up two hand bombs quickly. He is unbreakable once he starts on the mana bleed phase and while he has caught a rock, so do not beat yourself up if you cannot get the BO. Video on Hand Bomb setup:
- Naberius - Try to gather enough SP to start the fight with Boltstorm. Let your teammates run to the room while you fish for Calm ticks on the dead miniboss with normal attacks. Aim your bolts a bit to the left and down for headshots. Nabe breaks very easily, takes 1-2 flinches only.
- Milo - You can oneshot the knights to speed up the trash clear but check with your team first if they prefer the SP generation instead. In case you do not go for the phase skip, save Massive Impact for the totems.
- Cessair - If she starts her petrify aoe attacks, a Massive Impact can disrupt her.
- Enok - Once he comes out of the ground after the first pylon phase, aim at his head with Boltstorm while he is stunned. He is not very responsive to your Hand Bombs, so throw your Holy Water secondary weapon at his head instead. Two flinches will result in a BO.
- Irusan - Rarely any situation where I would recommend using Boltstorm here. Maybe if she starts up her tornado.
- Emmet - Possible to play the entire fight from afar. He has very low aggro detection, however you will be missing dps if you don’t hit your Hollow Shots.
- Jarnir - Very nasty fight, she has many anti-range attacks. Try to stick as close to her as possible and learn the fight. One tip I can give you is use your Spin Smash (I know, crazy) after her first, second and third jump that she does past the Giant sword phase.
- Bres - Try to dodge more towards her instead of backwards, she has a low turn rate on some attacks.
- Redeemers:
- Neamhein - Once Neit does his slam, you can hit your explosive attacks in his chest for 6x the usual damage (videos of these two attacks, but also sometimes if you release your Six Shooter detonator in his idle animation: Middle claw slam and Large Slam).
After each crab phase, Neam will come down from the sky. Prepare your Boltstorm for those moments. During the Gate of Babylon, you can stand on the circle to the left of the arena when facing the altar. Once the first spears go past you, just do a Dodge+Spin Smash to the middle. - Balor - Try to save your boltstorms for when his horse stops and he does the spinning attacks or facetank his orbs if you have the defence. When he is on foot I would only Boltstorm at the end of the ohko. You can sneak in some extra attacks during wall and when he flies up in the sky, see the videos:
- Video on how to minmax your damage even during Balor’s Wall: Hollow during Balor Wall
- Video on dealing damage when others cannot: Boltstorm during phase change
- Videos on using boltstorm when you get the most headshots out of it: Balor horse headshots and Balor ohko end Boltstorm
- Brigid - I usually try to save Boltstorm for when she kneels down on the ground and meteors start falling from the sky in the last phase. If you see her teleport, dodge toward a counter-attacker teammate.
- Laura - Nothing of note, she has a fairly large hitbox. Due to the teleports, try to stick close to your melee teammates.
- Neamhein - Once Neit does his slam, you can hit your explosive attacks in his chest for 6x the usual damage (videos of these two attacks, but also sometimes if you release your Six Shooter detonator in his idle animation: Middle claw slam and Large Slam).
- Space Time Distortion:
I have had little experience with this content so far, thus this portion of the guide will be just linking two very skillful clears from other players. The best way I found to learn the boss fights in this game is by watching others do it and then find my own way during particing.
- Taros: Nkarok's clear
- Eisen: WeiWei Li's clear